Beginner’s Guide to Big Bend Redfish

From Cedar Key to Panacea: Chasing Bronze Along Florida’s Forgotten Coast

Florida’s Big Bend is one of the last truly wild stretches of coastline left in the state. Unlike South Florida or the Gulf beaches farther west, the coast from Cedar Key through Suwannee, Horseshoe Beach, Steinhatchee, Keaton Beach, St. Marks and up toward Panacea is defined by miles of grass flats, tidal creeks, oyster bars, marshes, and shallow water. It’s skinny-water country—and that makes it redfish country. The region is known for expansive shallow flats, marsh systems, oyster bars, and year-round redfish habitat.  

If you’re new to chasing redfish in the Big Bend, the amount of water can feel overwhelming. The good news? Redfish are creatures of habit. Learn a few basics about tides, bait, and where fish move, and you’ll dramatically shorten the learning curve.


Understanding Big Bend Redfish

Redfish in the Big Bend live shallow. They spend their days hunting shrimp, mullet, crabs, and baitfish around grass flats, oyster bars, potholes, creek mouths and marsh edges. They commonly move with the tide—pushing shallow on incoming water and dropping into deeper cuts or potholes when water falls.  

One thing that surprises many newcomers: this coastline is extremely shallow. In some areas you can run a mile offshore and still only be in a few feet of water. Cedar Key especially is famous for its sprawling grass flats and skinny-water fishing opportunities.  

That means two things:

  1. Redfish have incredible habitat
  2. You can get stuck quickly if you ignore tides

Tides Matter More Than Almost Anything

Many new anglers focus on moon phases or weather. In the Big Bend, focus on tides first.

Redfish use moving water like a dinner bell.

Incoming Tide

As water rises, fish push onto flooded grass, oyster edges and marsh banks looking for shrimp and crabs.

This is often the best time for:

  • Sight-fishing tailing reds
  • Working shallow flats
  • Fishing grass points
  • Kayak fishing marshes

Redfish in Cedar Key commonly move shallow during the last part of the incoming tide and early outgoing periods.  

Outgoing Tide

Falling water funnels bait out of creeks and marsh drains.

Look for:

  • Small creek mouths
  • Tidal cuts
  • Oyster points
  • Potholes

Fish often stack up in these “choke points.”

Dead Low Tide

Don’t panic if you arrive at low water.

Many anglers struggle because they continue fishing shallow areas that are now dry. Instead, fish nearby potholes, channels, and deeper troughs where reds retreat until water rises again. Cedar Key anglers often target potholes and deeper channels during low water periods.  


Best Baits for Beginner Big Bend Redfish

You do not need twenty rods and a tackle store in your boat.

Start simple.

Live Bait

For beginners, these consistently produce:

  • Live shrimp
  • Finger mullet
  • Mud minnows
  • Cut mullet
  • Blue crab chunks

Local anglers regularly rely on shrimp, mullet and crab around Cedar Key and Big Bend waters.  

Rig them:

  • Under a popping cork
  • On a jig head
  • Knocker rig near oysters
  • Free-lined in shallow water

Artificial Lures

Keep a small tackle box with:

Gold spoon
A Big Bend classic. Covers water and rarely snags grass.

Paddle tails
3–4 inch soft plastics on 1/8 oz jig heads.

Gulp shrimp
A favorite among Big Bend anglers, especially under popping corks.  

Topwater plugs
Early mornings can be explosive.

Big Bend anglers frequently report strong topwater and spoon bites during redfish seasons.  


Beginner Gear Setup

No need for heavy saltwater gear.

A simple setup:

Rod:
7’ medium or medium-heavy spinning rod

Reel:
2500–3000 size spinning reel

Line:
10–15 lb braid

Leader:
20–25 lb fluorocarbon

This setup handles slot reds while still being light enough for trout and flounder.

Bring extra leader.

Big Bend oysters destroy fishing line.


Fishing From a Boat

The Big Bend is made for shallow boats.

Flats skiffs, jon boats, bay boats, and small skiffs excel here.

When fishing from a boat:

  • Drift grass flats
  • Use trolling motors in shallow water
  • Watch for oyster bars
  • Follow channels carefully
  • Study maps before running

The coastline is beautiful—but unforgiving.

A common beginner mistake is blasting across unknown flats at low tide.

Spend more time exploring than running.


Fishing From a Kayak

Kayaks may actually be the best way for beginners to learn Big Bend redfish.

Why?

You naturally slow down.

And slowing down catches fish.

Areas around Shell Mound, Steinhatchee, creek systems, and shallow marshes are popular among kayak anglers. Community anglers repeatedly mention creeks and shallow marsh access as ideal kayak water.  

Kayak advantages:

  • Access water boats can’t reach
  • Quiet approach
  • Easy sight fishing
  • Less fuel cost

Bring:

  • Stakeout pole
  • Good GPS or phone maps
  • Plenty of water
  • Tide chart

And remember:

You paddle in with the tide…

You paddle out against it.


Fishing From Shore

Most people assume Big Bend redfish require a boat.

Not true.

Shore anglers can still find success around:

  • Fishing piers
  • Bridge approaches
  • Creek mouths
  • Public access points
  • Marsh edges

Target moving water around structure.

Fish:

  • Live shrimp under corks
  • Gold spoons
  • Paddle tails

Focus less on casting far and more on finding current and bait.


Areas Worth Exploring

Without giving away anyone’s honey holes, beginners should explore:

Cedar Key: islands, oyster bars, grass flats and tidal creeks. The area is known for shallow keys and extensive grass systems.  

Suwannee: creek mouths and marshes

Horseshoe Beach: scattered oyster structure and grass

Steinhatchee: potholes, flats and creek systems

Keaton Beach: endless grass and redfish schools

St. Marks/Panacea: marsh shorelines and oyster edges


Final Thoughts

The Big Bend rewards anglers who slow down and learn water movement.

You do not need a $70,000 flats boat or a tackle room full of gear.

You need:

  • Moving water
  • Bait presence
  • Quiet approaches
  • Time on the water

Spend enough mornings watching mullet flip along a grass edge, and eventually you’ll see it:

A copper back pushing water through the marsh.

And once you catch your first Big Bend redfish, you’ll understand why so many anglers become obsessed with this stretch of Florida coast.

Tight lines from Cedar Key to Panacea.

Quota Hunt Applications Are Open

Florida Quota Hunt Applications Are Open: Here’s What North Florida Hunters Need to Know

If you plan on hunting Florida public land this season, now is the time to pay attention.

Florida’s quota hunt application periods are opening for the 2026–2027 season, and if you hunt Wildlife Management Areas (WMAs), this process can make the difference between spending fall in a stand—or sitting at home wishing you had applied. Quota permits help manage hunting pressure and provide quality opportunities across public lands throughout the state.

For many North Florida hunters, quota hunts are the gateway to some of the best deer, turkey, hog, and specialty opportunities available on public land.

Whether you’re a seasoned WMA hunter or applying for your first permit, here’s a breakdown of what you need to know.

What Is a Florida Quota Hunt?

Florida uses a quota permit system to control hunter numbers on certain public lands and hunt periods. These permits are used on many WMAs to reduce overcrowding and help wildlife managers maintain healthy game populations.

Not every hunt requires a quota permit, and rules vary by WMA and season, which is why reading the individual area brochure is critical. Community hunters frequently point to brochures as one of the most important tools for understanding access and hunt rules.

For hunters across North Florida, this could include opportunities for:

  • Whitetail deer
  • Turkey
  • Hog hunts
  • Waterfowl
  • Special opportunity hunts
  • Limited-entry public land hunts

How To Apply for Florida Quota Permits

The application process is fairly straightforward once you know where to go.

Step 1: Create or Log Into Your Account

Go to the official Florida licensing portal:

Go Outdoors Florida

Log into your account or create one if you’re a first-time applicant.

Step 2: Select “Apply for Limited Entry / Quota Permits”

Inside your account dashboard, navigate to:

Apply for Limited Entry / Quota Permits

Florida’s limited-entry system handles quota hunts, special opportunity hunts, and other draw-based opportunities.

Step 3: Research Your WMA Before Applying

Before selecting a hunt:

  • Read WMA brochures
  • Study hunt dates
  • Review weapon restrictions
  • Check quota requirements
  • Understand access rules

This is especially important because some North Florida areas have different rules depending on archery, muzzleloader, and general gun periods.

Step 4: Submit Your Choices

Choose your hunt preferences and submit your application before deadlines close.

Application periods open at designated times and close at midnight on the final day of the application period.

A Few Tips From Florida Public Land Hunters

Over time, experienced hunters around the state have learned a few things:

  • Build preference points over time
  • Apply consistently every year
  • Consider less popular dates or hunt periods
  • Read brochures carefully
  • Have backup plans

Many Florida hunters note that some highly sought-after quota hunts can take years of preference points to consistently draw.

North Florida Areas Worth Researching

Depending on where you live, many hunters begin looking at areas around:

  • Suwannee County
  • Big Bend region
  • Osceola area properties
  • North Central Florida WMAs
  • Public lands surrounding Madison and Lake City

The best approach is identifying land within driving distance and learning those properties year after year.

Final Thoughts

Florida’s public land system can feel confusing when you’re first getting started. Between brochures, preference points, quota applications, and different regulations, there’s definitely a learning curve.

But once you understand it, some incredible opportunities open up.

At Timber & Marsh, we’ll continue sharing North Florida hunting updates, public land information, and community discussions to help hunters stay informed.

If you’re applying this year, let us know what areas you’re putting in for and where you’re hoping to spend your fall.

Good luck, and we’ll see you in the woods.

— Timber & Marsh

New Florida State record Blue Catfish

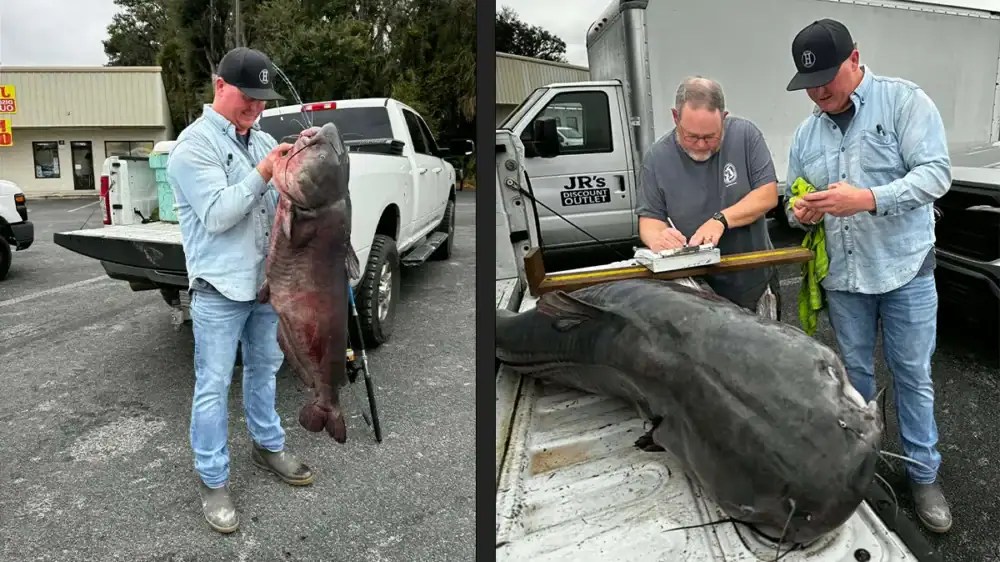
The news Has already been all over social media as well as the internet, but the Florida Blue Catfish record has just been broken by a North Florida man Named Justin Hodge from Old town. He caught this beast on our very own Suwannee River and it weighed in at 73.6lbs, beating the previous record by over 4lbs. For more information on the catch click the link below and read his interview he did with the Wired2Fish guys, they did a great job covering the story.

https://www.wired2fish.com/news/monster-blue-catfish-breaks-11-year-old-florida-record

Smoked Trout Dip

-Smoked Trout (preferably fresh caught)

-cream cheese

-sour cream

-fresh chives

-salt and pepper

So this is another super easy dish to make. To start, your gonna wanna smoke a fresh caught trout. I did mine over apple chips and smoked it at 180 degrees for 2 hours. yes you can brine it prior to smoking it and that can help with flavor for sure, in this case I did not brine it and it still came out amazing.

After your trout is smoked you want to carefully pull the skin off and pull all meat from the fish and set aside in a bowl to cool. Now I did use about a 3lb trout, so if you are using smaller trout you may want to use 2-3 for this recipe. After all the smoke trout has cooled, add equal parts of sour cream and cream cheese to the bowl and gentle fold until it is thoroughly mixed. Then add salt and pepper to taste.

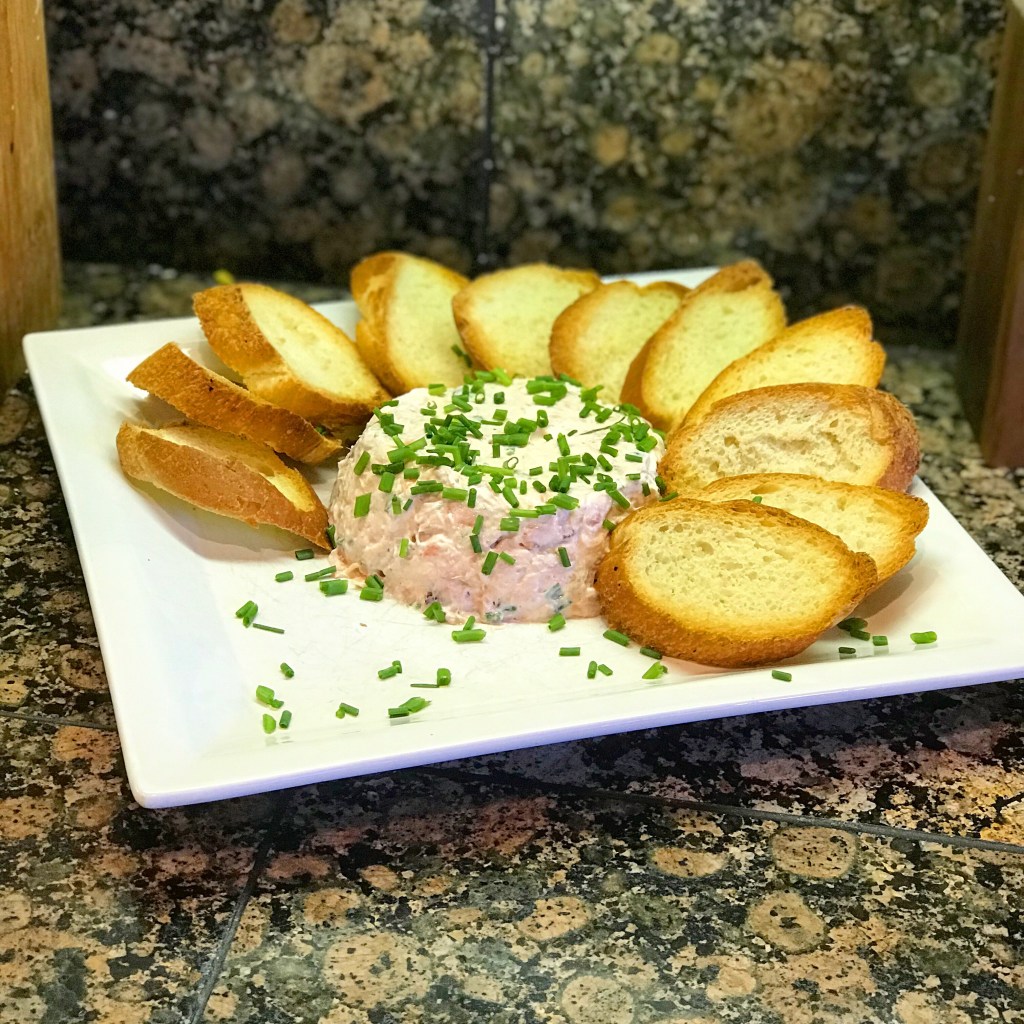
Now to get the killer presentation that I did in the above photo, you’re gonna line a smaller bowl with plastic wrap, and packed it with the smoked trout dip. After that you can flip the bowl onto a plate, remove the bowl, and carefully remove the plastic wrap. If done correctly you will end up with a perfectly molded pile of smoked trout dip. You can then garnish with with sliced fresh chives, sprinkled on top, and add sliced bread or crackers top the plate for dipping.

Toastada De Venado

One of the true joys of cooking wild game is discovering new and exciting ways to prepare it, keeping your meals fresh and inspiring throughout the year. This recipe draws from my California roots, where I was fortunate to experience some of the best Mexican food imaginable (sorry, Florida).

While venison rump roast isn’t typically considered a prized cut—it’s no backstrap, after all—it has incredible potential when treated right. Too often it ends up in pot roasts or stews, but I’ve found it shines in dishes like this rich, flavorful birria. Birria comes from a spanish word that meant “something of little value”. This is most likely why locals in the state of Jalisco Mx, where it originated, chose the name. They often used less desirable cuts of meat, often goat, and transformed it into a flavorful dish. Slow-cooked with guajillo chiles, chipotle in adobo, and beef broth, the meat becomes tender and deeply infused with the bold, smoky flavors of the sauce.

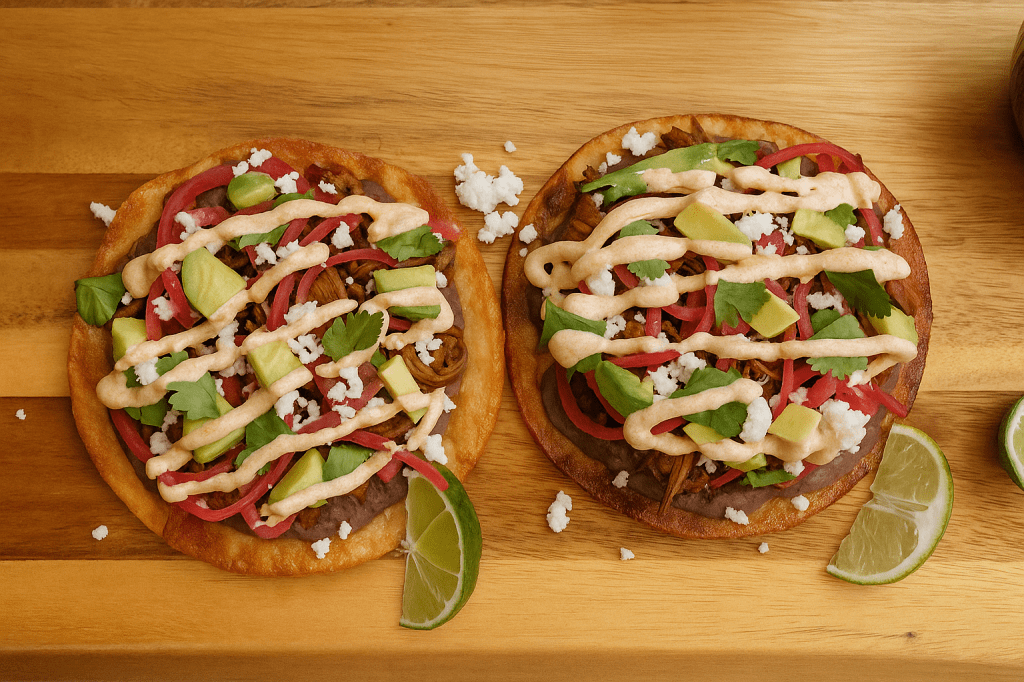
For this recipe, I’ve chosen to serve it as an elevated tostada—crispy, layered, and full of texture—but it’s equally delicious folded into tacos, wrapped into burritos, piled onto a torta, or scattered over nachos. However you serve it, this venison birria is a perfect way to celebrate wild game with a nod to classic Mexican comfort food.

Ingredients

For the Birria:

  • 2 ½ to 3 lbs venison rump roast (or beef chuck), cut into 3-inch cubes
  • 1 large white onion, chopped
  • ¼ cup cooking oil of choice
  • 1 Tbsp each: salt, black pepper, paprika, Mexican oregano, and cumin
  • 4 dried guajillo peppers, stemmed and seeded
  • 1 can (7 oz) chipotle peppers in adobo sauce
  • 1 cup beef broth
  • 2 garlic cloves
  • 1 can (14.5 oz) diced tomatoes

For the Pickled Red Onions:

  • 1 red onion, thinly sliced
  • 1 cup water
  • ½ cup white vinegar
  • 1 Tbsp sugar
  • ½ Tbsp salt
  • ½ Tbsp whole peppercorns
  • 1 garlic clove

For the Black Bean Purée:

  • 1 can (15 oz) black beans, drained and rinsed
  • ½ cup water
  • ½ cup beef stock
  • 1 tsp salt
  • 1 tsp black pepper
  • ½ Tbsp garlic powder
  • ½ Tbsp cumin

For the Tostadas:

  • Corn tortillas
  • ½ cup cooking oil (for frying)
  • Diced avocado
  • Crumbled queso fresco
  • Fresh cilantro

For the Consommé Crema:

  • ½ cup Mexican crema (or sour cream)
  • 3 Tbsp birria cooking liquid

Instructions

1. Prepare the Birria

Preheat the oven to 280°F (135°C).

In a large Dutch oven, heat ¼ cup of oil over medium-high heat. Add the cubed venison and chopped onion. Season with salt, pepper, paprika, Mexican oregano, and cumin. Sear until all sides of the meat are browned, about 6–8 minutes.

While the meat is browning, soak the dried guajillo peppers in hot water until softened, about 10 minutes. Remove from the water and transfer to a blender. Add chipotle peppers in adobo, beef broth, garlic, and diced tomatoes. Blend until smooth, forming a rich red purée.

Pour the sauce over the browned meat, stirring to combine. Bring to a gentle simmer, cover, and transfer to the preheated oven. Braise for 3 to 3½ hours, or until the meat is fork-tender.

Remove from the oven, shred the meat, and reserve the cooking liquid (consommé) for later use.


2. Pickle the Red Onions

In a small saucepan, combine water, vinegar, sugar, and salt. Heat until the sugar and salt dissolve completely, then remove from heat.

Pack the sliced red onion, peppercorns, and garlic into a 16 oz mason jar. Pour the hot brine over the onions, filling to the top. Let cool to room temperature before sealing. Refrigerate for at least 2–3 hours, or preferably overnight, for best flavor.


3. Make the Black Bean Purée

In a small saucepan, combine rinsed black beans, water, beef stock, salt, pepper, garlic powder, and cumin. Bring to a boil over medium-high heat, then reduce to medium-low and simmer for 10–12 minutes.

Transfer to a blender and process until smooth. Adjust consistency with a bit of broth if desired. Set aside.


4. Fry the Tostadas

In a shallow skillet, heat ½ cup of oil over medium-high heat. Fry each tortilla for 1–2 minutes per side, or until golden brown and crisp. Transfer to a paper towel-lined plate to drain excess oil.


5. Assemble the Tostadas

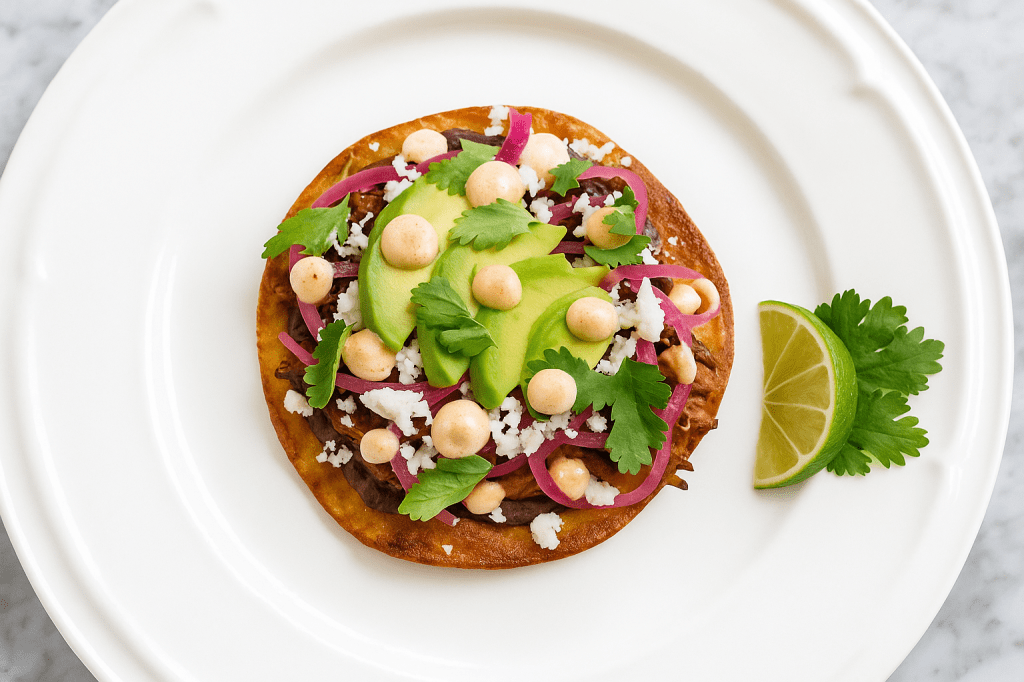
Spread a generous spoonful of black bean purée over each crispy tortilla. Top with a hearty portion of shredded birria. Garnish with pickled red onions, diced avocado, crumbled queso fresco, and fresh cilantro.

In a small bowl, whisk together Mexican crema and 3 tablespoons of the reserved birria consommé. Drizzle the consommé crema over each tostada and serve immediately.

Enjoy the perfect balance of smoky, tangy, and creamy flavors — a true celebration of wild game and Mexican-inspired cooking.